Tuesday, April 6, 2010

Chocolate & Prayer

Another bookmark!  I love this saying.  I am trying to stay away from the chocolate, so prayer is top of my list at the moment!!!


All stamps are from Rosebud Rubber Stamps, now sold by
 I Brake For Stamps 

Friday, April 2, 2010

My new spellbinders storage binder

Yeah!! ...... I dumped the old way of storing my spellbinders, and found a new way.  I love this.  Everything is all in one place and very easy to get to.  I have 50 sets of dies in this 1" binder!!!!!!


Okay...  I'll tell you what I did.  I took a soft cover 3 ring binder, a package of Grafix 8.5 X 11 chipboard (Medium Wt.), and some business size self-adhesive magnets (although larger sheets of magnets would have worked better).

I used the crop-a-dile to punch holes in the chipboard.  I simply used a piece of paper and a 3-hole punch as a template.  I just layed the punched white paper on top of the chipboard and lined up the crop-a-dile to punch the holes.  here is a little video I found that shows how to punch holes with the crop-a-dile.
   The binder I purchased was a 1" binder and fit about 6 sheets of chipboard.  I was worried that I might not get to put magnets on both sides of the chipboard in case the magnets stuck together, but no worries!!  It works perfectly.  The pages are nice and stiff, so they don't flop around, and it's easy to flip through and see what I have.  The dies stay in place and don't fall off.  The notebook is a little heavy.  It weighs about 5 pounds with 50 different sets of dies.


Here is my old storage system.  If anyone is interested in purchasing these cases, I have about 30 of the square CD cases (with magnets), and about 9 of the larger rectangular cases (with magnets.)  Send me an email at:  rosebudrs@aol.com


Wednesday, March 31, 2010

Prayer and Faith Bookmark


Bookmarker with some punched flowers.

Recipe:
Punch Bunch Silhouette Punch Flower 2
Punch Bunch Medium Sun Punch
Martha Stewart Border Punch
Cuttlebug heart embossing folder
Spellbinders Labels 2
Rosebud Rubber Stamps verse
Paper: Paper Pizazz -mixing soft pink roses


Friday, March 26, 2010

New Bookmarkers!! Praise Him

(click picture to enlarge for a better look)
I am finally back to working on my bookmarkers.  A long time project that I've been wanting to do.  I am finding that it's a challenge to fit everything I want to put onto such a small piece of paper, LOL!!  But I'm pretty happy with some of the ones that are finished.  I'll share them over the next few days.

For this bookmark I used:

  • Martha Stewart Punch

  • Rosebud Rubber Stamp


  • Colorbox rainbow pigment ink pad with clear embossing powder

  • paper: Cloud9/Sunrise Smoothie/Luster Floral

Thursday, March 25, 2010

Parent's 50th Anniversary Invitation

Okay, well while I'm on the subject of older projects that didn't get posted, here is my parent's 50th Anniversary Invitation that I did in 2007....  I scanned a couple of their wedding photos, printed it on glossy photo paper, used one for the front, and cut one out and made a pop-up out of it for the inside.  I used a sizzix alphabet die set for the "50" on glossy gold card stock


Happy Birthday Anie!

A birthday card for my niece, Anie's 1st birthday.  These pictures ended up on my other computer and I never got this published.  This should have been posted May, 2009!!  Ooops....

Tuesday, March 23, 2010

Tear Bear Baby Card

I discovered "tear bears" and I LOVE them!!!  This is my first attempt and I hope to be making many more.  You can do bears, bunnies, and all kind of animals.  I of course had to add my other new obsession - a paper flower.  This time I used a rose made from pink vellum.

Here are a few sources if you want to check out Tear Bear patterns and samples.  Don't forget to look on ebay and SCS.

http://www.thebearyscrap.com/
http://scrapishments.blogspot.com/
http://www.tear-bears.com/CustomerShowcase.htm
http://www.flickr.com/photos/funscrap/
http://preciouspiecingsbylisa.ecrater.com/product.php?pid=5524622#
http://www.mulberrybear.com/servlet/StoreFront

What I used for the bear:
For the tear bear I used the heavy mulberry paper available at some of the above links.
The eye patterns are available here: http://thebearyscrap.com/pages/printables.htm
The nose was made from the pad of a EK Success paw punch.  You can also use a Fiskars oval punch (or cut it out by hand).
For the eye lashes I used a Pigma Micron 03 black pen 0.35mm
For the white lines on the nose I used a Sakura White Gelly Roll Pen -MED
What I used for the Rose:
Other:
  • Spellbinders Labels 2
  • Stampin' Up Patterned Paper
  • Embossed Paper
  • Stamp: Rosebud Rubber Stamps


Sunday, February 28, 2010

Dreaming of Craft Shopping

I desperately wanted to spend lots of money on some new stamps that I found, but finances are tight at the moment, so I decided to use what I had and make a card instead.  So, dreaming of buying stamps is as far as I'm going to get right now.  Looking at my new card is helping to realize that I have more than enough supplies to make cards every day for years, LOL!!!  Without having to spend ANY money......

Click HERE for a good video about how to make the paper roses.  I used vellum for these.

What I used for today's card:
  • Stamps:  Rosebud Rubber Stamps (stamp store, stamp), JustRite Stampers (oval border)
  • Paper:  White (GinaK), Kraft, s.e.i Chick-a-doo pee-wee's kiwis, hickups
  • Ribbon: Colorbok from Michael's
  • Martha Stewart butterfly, rose leaf punch
  • Roses:  Punch Bunch 6 petal flower punch (medium), tan vellum paper
  • Spellbinders rectangles and ovals


Thursday, February 25, 2010

Easter Lilies

I finally found a home for the lily that I made.  I just got my 6 petal punches, so I'll be making up lots of roses for my next cards!!!  However, I'm fighting a cold, plus my oldest son has a sleep over tomorrow night, so it might be a couple of days before I get the next card up here.  Hope you are staying warm wherever you are.  We're getting snow right now..... brrrrr
  • Stamps: Rosebud Rubber Stamps
  • Paper:  Stampin' Up
  • Spellbinders Large Scallop Ovals, Curved Rectangles, Daisy Heads (leaves of flower)
  • Martha Stewart Arch Lattice Punch
  • Punches:  Punch Bunch Mega Theme Punch -Lily Petals, Medium Aspen Flake
  • Copic Markers for Cross image and edge of scallop, red dots on flower
  • Pink chalk for petals of flower

Monday, February 22, 2010

Jesus on Cross, roses

I am still waiting for my 6 petal punches so I can make more roses, but I decided to just make a pattern and cut out the flowers for this card.  You can use a stencil material and make your own stencils if you don't want to purchase punches.  This works for the ones that are not too detailed, or not used very often.  I plan on making lots of roses, so the 6 petal punch in a few different sizes will be well worth the money!!   Here is a good tutorial on how to make the roses with the 6 petal punch:    http://www.youtube.com/watch?v=KHPbg3nZcnM   I used mulberry paper for my roses.

For this card I used:
  • Spellbinders fleur-de-lis pendants
  • Rosebud Rubber Stamps Easter stamp
  • Paper: floral background-Paper Pizazz, mauve mulberry paper for roses, Bazzill Basics walnut, green, misc. black paper, green rice paper (old misc sample stock).
  • Fleur-de-lis border punch - Fiskars
  • 6 petal punch for roses - Punch Bunch
  • Punch Bunch Birch leaf punch

Sunday, February 21, 2010

Eater Bunnies

 
My first attempt at the copics airbrush system.  The blue came out a little dark, but it's a nice contrast to the background.  I don't think I had everything hooked up right.  I'll have to work on that.  I used copic markers for the image.

 
What I used:
  • Rosebud Rubber Stamps Easter Image 
  • Spellbinders -Classic Lace Border
  • Martha Stewart Lace Border Punch
  • Butterfly - Vintaj Natural Brass Co.
  • Prima Flowers
  • Paper - Archiver's Exclusive "Spring Blossoms" daisyd's (an older pattern), black cardstock, papertrey ink white cardstock
  • Ink- Momentos Tuxedo Black

Friday, February 19, 2010

Dance, Sing, Live


Finally had time to sit down and make a card with my new favorite craft - paper flowers!!  I'm including a picture of everything I used for the flowers, except for the little yellow flowers.  I added those on at the end.  I used the Paper Shaper (white pad) and the white tool (and/or stylus) to shape the center of the flowers.  I used the side of the metal stylus to curl the petals of the flowers.  I used the large Cuttlebug Asterisks for the base of the large flower, and I glued the red hearts onto it.

For the big red flower I used:
For the smaller flowers I used:
Other items used in the card:
  • Rosebud Rubber Stamps - dancing girl stamp (not sure if this is still available)
  • Verve Stamp Set Beautiful You
  • Basic Grey Wisteria
  • Scenic Route Sonoma (striped paper)
  • Bazzill Olive/OP
  • misc sheer ribbon

Wednesday, February 17, 2010

Paper Rose

For this rose I used the pear punch and followed the tutorial on Claire's blog.  I don't think I can link directly to that page, so when you get to her website, click on "blog" and then click on "punch project" and then start going through the pages. She has some amazing flowers on her blog!!!  It is well worth the look!! 
  If you are in the market for a paper punch, please visit my new punch store.  See my previous post for a coupon code.

Tuesday, February 16, 2010

Paper Punches


I have discovered a new craft!! Not really new, but a new obsession for me. Paper flowers made mostly from paper punches. Here are a few that I've tried so far. Please look for some examples in the next few days, and hopefully some tutorials coming soon. Also, if shopping for punches, please purchase from my store. I am now selling the punch bunch punches. All profits will go towards treatments for my 6 year old who is sick and in need of treaments that insurance will not pay for. Thank You!! Here is the link to my store: http://www.littleangelsonlinestore.com/Store/categories.php?cat=88

My store was started as a store for baby memorial products, so you will see mostly those products on the website if you look around. It was too expensive to start a new craft site, so this is where the punches are. Please ask if you have any questions. Delivery will be about 7-10 days in the beginning while I build up my inventory, but I am offering slightly discounted pricing on all orders. Also, for orders of more than $75, you will get free shipping. Enter coupon code: PUNCHCRAZY at checkout for the free shipping.


Thursday, February 11, 2010

Paper Flowers


I've just found a new craft!! What I call "Floral Punch Craft".....I have more punches on the way and hope to share much more with you in the very near future.
  • Punches: McGill Petite Petals and Multi Flowers, mini sun punch ($1 bin at Michaels), Martha Stewart Oak Leaf
  • Spellbinders
  • Cuttlebug hearts embossing folder
  • Happy Birthday stamp
  • Bee charm (sorry, no source. I think it was from a sample bag from the HIA craft show -like 10 years ago, LOL.)
  • The center of the flower was done with a paper quilling technique. It's called a "fringed flower"...I cut mine by hand, and did not spread it out much. I needed a tighter look for the center of the flower. Then I added a dot of garnet glitter glue to the center of some of them.


Wednesday, February 10, 2010

Birthdays


Lots of birthdays coming up this month. This is the first one.

  • Whiff of Joy Stamps
  • Copic Markers
  • Martha Stewart border punch
  • Spellbinders label, octagons


Christmas in February


Okay, I'm a little late in getting this up..... hope everyone had a great Christmas!!!


  • Paper: Basic Gray (?), misc brown, red, white
  • Prima flowers poinsettias
  • Martha Stewart Branch punch
  • red button
  • Cuttlebug embossing folder
  • Spellbinders circles and scalloped circles
  • JustRite Stampers

Thursday, October 29, 2009

Thank You

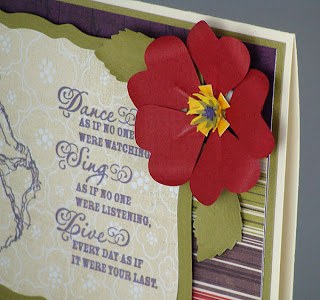
A quick Thank You card using spellbinders Decorative Frames and Labels 2. The background is stamped with a SP rose stamp in blue ink. The frame was sponged with the same ink. I finally figured out how to do it without the color bleeding and making a mess!! Now if I could only remember how I did it..... I think the trick was to use pigment ink and to do it slowly and carefully.  This card was pretty much cased from one of Becca's.

Precious Moments Puppies


Thinking of You card. A little different from the typical pastels that go with Precious Moments, but I was in the mood for watermelon colors. I used spellbindesr ovals and labels along with some flower brads and green ribbon.

Tuesday, October 27, 2009

Fall Season


"To everything there is a season, and a time for every purpose under Heaven. Ecclesiastes 3:1
Card Details:
  • Just Rite Stampers
  • Rosebud Rubber Stamps (verse)
  • Spellbinders octagon, ovals
  • Paper: pumpkin embossed, green, brown
  • real pinecones!
  • Martha Stewart branch punch
  • satin ribbon